Making a simple AI on a Raspberry Pi computer
I create a fully functional AI out of a Raspberry Pi - including voice recognition, facial recognition, and text-to-speech.

I create a fully functional AI out of a Raspberry Pi - including voice recognition, facial recognition, and text-to-speech.
Choose the hardware
Here is the list of my hardware components (as of 02/05/14):
- Raspberry Pi Model
- Raspberry Pi Camera
- USB microphone
- CM19A RF Transceiver
- 8GB SD Card
- USB 2.0 10-port Hub
- USB WIFI adaptor
- Computer speakers
- HDMI cable
And here is the explanation: I will be using a Raspberry Pi Model B for the “computer” and using Raspbian linux for the OS. There are plenty of other places that show you how to get started so I am going to skip that here. For visuals I am using the Raspberry Pi Camera which is nicely mounted in a custom made enclosure. For audio I am using a simple microphone (this one is nicebecause it blinks when it is recording and you can turn it off - and it is cheap!). I already have X10 transcievers and was planning on using my old CM15A until it just up and died almost exactly two years after I bought it. Sidenote: X10 is terrible about helping to fix these things and a replacement is not cheap to find, so avoid X10 if you can. Since I am stuck using X10 I decided to get the cheap CM19A USB RF transceiverwhich works well although I can’t use power line codes with it. Note - if you want cheap X10 stuff, check out eBay.
Choosing the software
Given an Linux environment, there are many choices of a coding language. I would normally choose of the following (ordered according to my favorite): Perl, Java, C++, PHP, Basic. However, one must keep in mind that the RPi is 700MHz processor with 512MB RAM. Thus, it is not something that I can program from the bottom-up because even a simple image recognition program that I could write would tear up the processor (I am too dumb and lazy to write on that is memory efficient). Thus, to alleviate heavy lifting I would turn to online APIs.
Thus, my choice of a programming language is one which has a number of great APIs and wrappers available. Python was presented to me as a great choice, so I went with that. There are many APIs available for Python. However, everything I am about to show could just as easily been done with Java. Also, I had never programmed with Python before so this was going to be a good opportunity for me to learn.
See TTS and STT in action!
Now how does it work? Lets find out!
Text-to-speech
I found two options for TTS: espeak (from Debian) or using the Google TTS. First I tried using espeak, which was easy to get going. However it suffers from a drawback that when it speaks long sentence it slows down and sounds like a Dalek (documented here). Since I would be saying things that are >100 words this was not a good solution, but maybe useful for you. Google TTS works great and is easy to get going, however it suffers from a drawback that you can only say 100 characters at a time. However the speech clarity is nice so I decided to go with this. It is fairly simple to use, the main command is just:
mpg123 -a hw:YOURALSANUMBER -q 'http://translate.google.com/translate_tts?tl=en&q=WORD1%20WORD2%ETC'
You’ll have to install and configure mpg123 to work (there are other places to figure that out, let me know if you need help). Essentially the next part was to write some code that would split the sentences into 100 character sentences. This is accomplished below:
def saySomething(txt,language):
    print "speaking " + language
    words = txt.split()
    numWords = len(words)
    sentences = ""
    curSentence = 0
    curCharacters = 0
    curWord = 0
    for word in words:
        if curCharacters+len(word)+1<100:
            sentences = sentences+'%20'+word
        else:
            curSentence = curSentence + 1
            sentences = sentences + "111" + word
            curCharacters = 0
        curCharacters = curCharacters + len(word)+1
        curWord = curWord + 1

    feedTxt = sentences.split("111")
    for sentence in feedTxt:
    sentence = sentence.replace("'","%27")
    print sentence
    os.system("mpg123 -a hw:1 -q 'http://translate.google.com/translate_tts?tl="+language+"&q=" + sentence + "'")
Speech-to-text
The STT is pretty simple as it consists of three steps: activation, acquisition, and translation. Activation can be accomplished via a “key press” but I much rather use voice activation. Assuming you live in a normally quiet atmosphere, it is perfectly practical (and easy) to calculate the root mean square noise (RMS) and activate upon a given threshold. You can set the threshold by acquiring a distribution and looking at standard deviations, or you can just choose a number. Either way you can look at typical RMS values for your given mic/environment using the following:
import audioop
import pyaudio
rms = []
for i in range(0,100):
    p = pyaudio.PyAudio()
    stream = p.open(format=pyaudio.paInt16,channels=1,rate=44100,input=True,frames_per_buffer=1024)
    data = stream.read(1024)
    rmsTemp = audioop.rms(data,2)
    print rmsTemp
stream.stop_stream()
stream.close()
p.terminate()
I’ve set my threshold to 1050 (an arbitrary value, you should find your own). Now then the first major subroutine of the AI can be set - the listening function. This will essentially run infinitely and its nice to allow this to run as a thread (it may be needed later). This is the basic code for the activation:
import audioop
import pyaudio
def listenToSurroundings(threadName):
    try:
        print "Started listening on thread %s" % threadName
        chunk = 1024

        volumeThreshold = 1050

        while (1):
            print "Starting listening stream"
            rmsTemp = 0
            p = pyaudio.PyAudio()
            stream = p.open(format=pyaudio.paInt16,channels=1,rate=16000,input=True,frames_per_buffer=chunk)

            while rmsTemp < volumeThreshold
                data = stream.read(chunk)
                rmsTemp = audioop.rms(data,2)
            stream.stop_stream()
            stream.close()
            p.terminate()
            output = getUsersVoice(5)
            processInput(output)
    except:
        import traceback
                print traceback.format_exc()
The try/except block is to catch errors, especially useful for the debug stage. The aquisition and translation stages are done in another subroutine, getUsersVoice. This is a pretty simple code - it will first beep to notify that aquisition has begun. Then it will use arecord to record the audio for a given amount of time. It will beep when finished. Then it will send the text to the Google Speech API. For this last step I use a separate bash file, parseVoiceText.sh just because there are so many quotations. Here is the code:
def getUsersVoice(speakingTime):
    os.system("mpg123 -a hw:YOURALSAPLAYBACK YOURBEEPSOUND.mp3 > /dev/null 2>&1 ")
    os.system("arecord -D plughw:YOURALSARECORDING -f cd -t wav -d %d -r 16000 | flac - -f --best --sample-rate 16000 -o out.flac> /dev/null 2>&1 " % speakingTime)
    os.system("mpg123 -a hw:YOURALSAPLAYBACK YOURBEEPSOUND.mp3 > /dev/null 2>&1 ")
    os.system("./parseVoiceText.sh ")
    output = ""
    with open('txt.out','r') as f:
        output = f.readline()
    print "output:"
    print output[1:-2]
    theOutput = output[1:-2]
    return theOutput
And the bash file:
# parseVoiceText.sh
wget -O - -o /dev/null --post-file out.flac --header="Content-Type: audio/x-flac; rate=16000" http://www.google.com/speech-api/v1/recognize?lang=en | sed -e 's/[{}]/''/g'| awk -v k="text" '{n=split($0,a,","); for (i=1; i<=n; i++) print a[i]; exit }' | awk -F: 'NR==3 { print $3; exit }' > txt.out
As you probably noticed, I didn’t tell you about processInput(). That’s going to be the main function to handle events. I am currently fleshing that out and will post back when I have some more on that.
How to do facial recognition
Now how does it work? Lets find out!
Once again, this will be short and sweet. The code here is the most simple, it does not save any of the processed images. If people are interested in that I can post code that will save images of the faces with their features labeled, but I am excluding that now for clarity. Here is the basic code:
def recognizeFace():
        # Take picture and save to webserver
        filename = "/var/www/temp.jpg"
        subprocess.call("sudo raspistill -w "+ str(saveWidth) +" -h "+ str(saveHeight) + " -t 1 -n -vf -e " + fileType + " -q 15 -o %s" % filename, shell=True)
        print "Captured image: %s" % filename

        # Send the picture to the SkyBio Api
        theFileLocation =  "http://YOURPUBLICIP/temp.jpg"
        client = FaceClient(YOURSKYBIOAPI,YOURSKYBIOAPISECRET)
        photo = client.faces_recognize('all',theFileLocation, namespace = 'YOURSKYBIONAMESPACE')

        # Number of people in photo
        numFaces = len(photo['photos'][0]['tags'])
        print "Detected " + str(numFaces) + " faces."

        # Go through each face
        theSpeech = ""
        while iii2: # proxy for if something happened
                print theSpeech
                saySomething(theSpeech,"en")
Now for the explanation. Firstly, this code uses this API which gives 5000 calls/month for free for facial recognition. It works well if you train it well. I will defer the explanation of the training to others who wrote beautifully on this.
For this API to work, though, you have to send the picture from a location on the Web. There are a few ways to do this. If you already have a webserver you can just SCP it over your VPN network. I went for a simpler solution. I hosted the image on my RPi using an apache webserver - instructions are here. Don’t forget to forward port 80. You can get your public IP address here. Now you can use the /var/www/ as your web server folder, and you can pass those images to SkyBio. Note: I suggest password protecting your folder using .htaccess
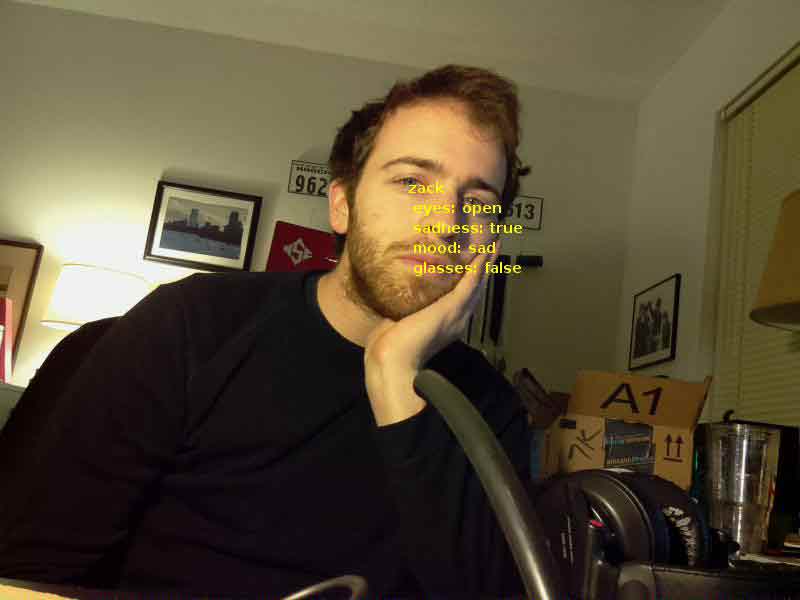
This code just finds each face. However, SkyBio tries to find all sorts of other things like whether you have glasses or not. You can probe all these things (and their confidence levels) with the following:
skybio_metrics = ['eyes','sadness','mood','glasses']
for metric in skybio_metrics:
    val = photo['photos'][0]['tags'][iii]['attributes'][metric]['value']
    conf = photo['photos'][0]['tags'][iii]['attributes'][metric]['confidence']
    if conf > 20:
        # do something with metric
Does this work? See for yourself (this output comes from a slightly modified version of above that prints the metric over the face):
Adding a face to the AI
Now how does it work? Lets find out!
So for a face, I thought I would try making some sort of realtime voice animating system. I made a very very simple one in python. Here is an example of what it looks like and sounds like:
The source code is very simple. Get the whole code at my github page (the following excludes the saySomething function which is part of mouth_function. Basically the following code opens a process to say something and at the same time tries to animate it with an open/closing mouth. The timing between the mouth open and mouth closed comes from an average timing I got from recording the Google TTS and recording how much time it takes to say a word and the amount of time between words. The other trick is to count the number of syllables in a word.
Python has a fast way of doing this using nltk (coded below).
import pygame, sys, time, random
from pygame.locals import *
from time import *
import curses
from curses.ascii import isdigit
import nltk
from nltk.corpus import cmudict
import os
import thread
import threading

d = cmudict.dict()

def nsyl(word):
        return [len(list(y for y in x if isdigit(y[-1]))) for x in d[word.lower()]]

pygame.init()
windowSurface = pygame.display.set_mode((500, 400), 0, 32)
pygame.display.set_caption("Bounce")

BLACK = (0, 0, 0)
WHITE = (255, 255, 255)
RED = (255, 0, 0)
GREEN = (0, 255, 0)
BLUE = (0, 0, 255)
YELLOW = (255,255,0)

info = pygame.display.Info()
sw = info.current_w
sh = info.current_h
y = 0
phrase = "Hi there. How are you doing"
windowSurface.fill(WHITE)
pygame.draw.circle(windowSurface, YELLOW , (250,200), 80, 0)
pygame.draw.circle(windowSurface, BLACK,(280,170), 10, 0)
pygame.draw.circle(windowSurface, BLACK,(220,170), 10, 0)

pygame.draw.ellipse(windowSurface,BLACK,(225,230,50,10),0)
myfont = pygame.font.SysFont("ComicSans", 35)
pygame.display.update()
sleep(1)
paragraph =  str(sys.argv[1])
thread.start_new_thread( saySomething,(paragraph,"en",))
workingSentence = ""
sleep(0.26)
for phrase in paragraph.split("?"):
    for sentence in phrase.split("."):
        for word in sentence.split():
            windowSurface.fill(WHITE)
            pygame.draw.circle(windowSurface, YELLOW , (250,200), 80, 0)
            pygame.draw.circle(windowSurface, BLACK,(280,170), 10, 0)
            pygame.draw.circle(windowSurface, BLACK,(220,170), 10, 0)

            pygame.draw.ellipse(windowSurface,BLACK,(225,220,50,30),0)
            myfont = pygame.font.SysFont("ComicSans", 17)
            workingSentence += word + " "
            label = myfont.render(workingSentence, 1, BLACK)
            windowSurface.blit(label, (5, 5))
            pygame.display.update()
            syl = nsyl(word)
            syl = syl[0]
            sleep(0.185*float(syl))

            windowSurface.fill(WHITE)
            pygame.draw.circle(windowSurface, YELLOW , (250,200), 80, 0)
            pygame.draw.circle(windowSurface, BLACK,(280,170), 10, 0)
            pygame.draw.circle(windowSurface, BLACK,(220,170), 10, 0)

            pygame.draw.ellipse(windowSurface,BLACK,(225,230,50,10),0)
            myfont = pygame.font.SysFont("ComicSans", 17)
            label = myfont.render(workingSentence, 1, BLACK)
            windowSurface.blit(label, (5, 5))
            pygame.display.update()
            sleep(0.082)
        windowSurface.fill(WHITE)
        pygame.draw.circle(windowSurface, YELLOW , (250,200), 80, 0)
        pygame.draw.circle(windowSurface, BLACK,(280,170), 10, 0)
        pygame.draw.circle(windowSurface, BLACK,(220,170), 10, 0)

        pygame.draw.ellipse(windowSurface,BLACK,(225,230,50,10),0)
        myfont = pygame.font.SysFont("ComicSans", 17)
        label = myfont.render(workingSentence, 1, BLACK)
        windowSurface.blit(label, (5, 5))
        pygame.display.update()
        sleep(0.16)

sleep(1)
Adding personality
This part is actually very easy - there is a fantastic API already available that does the job. Use this API and then all that needs to be done for the AI program is creating a function that feeds in the query to the robot and gets the response:
from chatterbotapi import ChatterBotFactory, ChatterBotType

def getAIresponse2(s):
    factory = ChatterBotFactory()
    bot2 = factory.create(ChatterBotType.CLEVERBOT)
    bot2session = bot2.create_session()
    response = bot2session.think(s)
    return response
In this example I use CLEVERBOT but there are certainly other bots to choose from. A little later I will talk about the predicament to develop a personalized chatterbot baesd on chat histories.